NAVIGATION

Enter a search key word or phrase.

Showing posts with label WINDOWS. Show all posts

Friday, July 20, 2012

HOW TO REPAIR MBR ON WINDOWS 7


Sometimes you can corrupt Windows' MBR (Master Boot Record) unintentionally, through installation of another operating system for instance, and you need to repair it before Windows can boot again. The error message that you usually get is "Operating System not found". Under Win 95, 98 and ME, you could have used a standard MS-DOS utility called FDISK in the Command Prompt console. However, FDISK is not distributed with Win NT, 2000, XP, Vista, and 7. So you either have to resort to finding an alternative utility called MbrFix.exe and run it from floppy, optical or USB drive or follow these direction from the installation DVD to repair your MBR. While these directions are specific to Win 7, you maybe able to use the knowledge gained to apply to your particular Win install.

Instructions

Step 1:
Insert Win 7 installation DVD and boot from DVD drive. While in some older systems you may have to change boot order through system BIOS, most newer systems allow booting from DVD without changing boot order by simply clicking on any key when prompted to doing so.

Step 2:
Choose your default "Language", "Time", and "keyboard Input" on the first window and click next.

Stepp 3:
You're now presented with 3 choices. Click on

DONTs OF COMPUTER REPAIRS

What not to do. Do not shell out for such programs like Norton Anti Virus, Mcafee Anti Virus, or any other over priced program. These programs expend more on advertising than on the quality of their product, and most will not assist you in your mission to get your home computer repaired. Also there are programs obtainable only by way of the internet which will not resolve any of your home computer repair problems and only make your bank account decrease.

Some programs are, Registry Repair, Registry Cleaner, Reg Mechanic, and Reg Cure. These programs will cause you a lot greater harm than benefit, and there are not a lot of ways to get help in the occasion you do not recognize how it works.

I have experimented with most of the programs in one way or more on my home computer. You can discover a lot of them when you do a very easy Google query for "home computer repair". I have thus far not found one program that works effectively for a broad variety of computer repair problems. There are a number of programs that function well for very precise list of home computer repair jobs, the problem then is in recognizing your individual issue, and can it be fixed without spending money; often the answer is yes!

In the occasion I do ever find a program that can resolve a lot of the normal home computer repair issues, I won't delay in endorsing the program and I will profit monetarily. You have been warned. I am human and this is what I love to do, if I can get paid for it, while staying honest, I will. Until then, on with the free home computer repair counsel and instruction...

Home Computer Repair - how did I learn?

How do I identify how to repair home computer repair problems? I have learned a lot, diverse things from different programs that I had to buy. I educated myself that these programs were not doing anything really complicated, everything I knew I could do myself .

Tuesday, May 1, 2012

How To Change Your IP Address

How To Change Your IP Address


1. Click on "Start" in the bottom left hand corner of screen
2. Click on "Run"
3. Type in "command" and hit ok

You should now be at an MSDOS prompt screen.

4. Type "ipconfig /release" just like that, and hit "enter"
5. Type "exit" and leave the prompt
6. Right-click on "Network Places" or "My Network Places" on your desktop.
7. Click on "properties"

You should now be on a screen with something titled "Local Area Connection", or something close to that, and, if you have a network hooked up, all of your other networks.

8. Right click on "Local Area Connection" and click "properties"
9. Double-click on the "Internet Protocol (TCP/IP)" from the list under the "General" tab
10. Click on "Use the following IP address" under the "General" tab
11. Create an IP address (It doesn't matter what it is. I just type 1 and 2 until i fill the area up).
12. Press "Tab" and it should automatically fill in the "Subnet Mask" section with default

Thursday, April 19, 2012

Forgot Windows 7 Password?

Many reasons attributed for Windows 7 passwords being forgotten or lost.
Before we find a certain solution to unlock the forgotten Windows 7 administrator password, we need to know the reasons why they were forgotten or lost. Thus in the future or after we successfully unlock the password, we then can avoid similar problem as possible as we can.
Reasons:
1. The Windows 7 password is difficult to remember, long, arbitrary and complex.
2. Frequently changing the password.
3. Having long time away from the computer.
4. Got computer hacked by others etc.
5. Or you are trying to bypass other's password

After we get to know how we forgot or lost our Windows 7 password, we now can start to unlock password Windows 7 with purpose. Step-by-step tutorials on how to unlock Windows 7 admin password:
Solution 1: Use Windows 7 built-in Administrator Account.
You may not know the Windows 7 built-in Administrator account which has full privilege over the computer is without password protected by default. This is because it is hidden so that you cannot notice of it. Therefore, we can unlock password Windows 7 with it if no change to its default settings.
Solution 1:
1. Start computer and then press “Ctrl+Alt+Delete” twice at Windows Login Screen.

Wednesday, April 18, 2012

Best File System For Windows Xp

Best File System to Format your System

While formatting process, we have to format our systems. Formatting is a process of deleting entire data on you selected drive or creating tracks and sectors. Formatting is very important process before install Operating System. Which is the best file system for formatting?

Inserting data on sectors and clusters is called file system. There are two file systems are available for windows operating systems. They are FAT32, NTFS. FAT stands for File Allocation Table and NTFS stands for Network Technology File System. FAT32 is old file system and NTFS is new file system.

Tuesday, April 17, 2012

How To Remove Bad Sectors From Hard Disk

Most people might have faced problems like CRC (Cyclic Redundany Check) or cannot open the files or programs properly. This is because the hard disk might have filled with bad sectors which makes your data unreadable or corrupt. Any data stored in bad sector is likely to be lost. Usually data spreads across the sectors of the hard disk. You get error message if you try opening a file when the data related to that particular file is stored in bad sectors. Bad sectors occur due to physical damage or magnetic head problem in the hard disk. This is an indication that the hard disk would crash soon.

The bad sectors can be recovered by Low Level formatting using DOS command utility "FDISK". You have to use Windows 98 bootable CD or DOS bootable floppy to boot the computer from DOS and type FDISK and press "ENTER" key. FDISK is a utility to create hard disk partitions and format the created partitions. It is always better to remove the bad sector filled partition and create partition again then format the partition using FDISK utility to remove bad sectors. You can use another DOS command SCANDISK to scan for bad sectors, but this command will mark the bad sector to be skipped so that no data is stored in bad sectors but the hard disk will continue having bad sectors.

How To Backup And Restore Registry

To SAVE or EXPORT or BACKUP registry.
Go to START and click on RUN or hold WINDOWS key and press R to open RUN window. Type 
" REGEDIT " without double quotes and press ENTER key to open REGISTRY EDITOR.
Go to FILE menu and click on EXPORT.
Give a name and path and click on OPEN to save the registry file.

Tuesday, April 10, 2012

How To Create A Dot Plot In Microsoft Office Excel

A Dot Plot or Dot Chart is one of the most simple types of plots and they are very easy to create in Excel without having to use a Chart object. The trick is to use the REPT() function to display the dot plot either horizontally or vertically. I will explain how this is done and you can download the Dot Plot Example file to see how I created the dot plots on this page.
Dot Plot - 64px  Download the Example Dot Plot (dot-plot.xls)

Horizontal Dot Plot

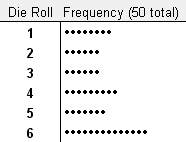
I like board games. The example dot plot below shows the number of times out of 50 that I rolled a 1-6 with a single die. Actually I cheated because these values were randomly generated in Excel (see the example file). But it demonstrates the point.
Dot Plot
Fig 1. A Horizontal Dot Plot
A horizontal dot plot is probably the easiest type to create. Just list the category labels in column A. Then in column B enter the corresponding numbers. To create the dots for the dot chart in column C enter the formula =REPT("•",B1) or =REPT(CHAR(149),B1) and then copy the formula down. Then, hide column B. Pretty simple, eh?..

Monday, April 9, 2012

CHOSING THE FINEST REGISTRY CLEANER SOFTWARE

Start-up Manager also aids to handle the software plans that start off up when any windows software boots up. As a result, an person must use this program to preserve his running system running correctly. These guidelines on how to clean up your computer registry will significantly aid you preserve a Computer jogging faster and more proficiently, therefore growing the utility from the Laptop. I personally managed to thoroughly clean up my pc by downloading substantial top quality registry cleaner software program and would very recommend it.
The computers registry is amazingly sophisticated and must be taken care of at least when each and every thirty day period in buy to preserve a pc operating efficiently. Jogging a registry upkeep is essential to have a rapidly and productive personal computer. The computers registry acts as a database that retains virtually everything that is being completed and saved on the pc. It merchants documents of each and every Net internet site that your personal computer has visited. It retains info about internet configurations and desktop, and also the former settings of the computer system. These are only some of its essential capabilities.
In earlier time, registry cleansing device only gives registry repair service and optimization. But now almost each developer provides a lot of servicing tools for program fix and general optimization, such as IE fix device, junk file cleaners, startup supervisor, plan uninstaller, internet optimizer and so on. And the resources are turning out to be a lot much more critical for Laptop maintenance for common Laptop end users. You not only need a registry cleaner but also a 1-quit solution to Personal computer routine maintenance. So make confident these equipment are packed into it.

Tuesday, April 3, 2012

MICROSOFT WINDOWS 8

Microsoft showed off a pre-beta build of Windows 8 at its BUILD conference in last September. We got our hands on a copy and took it for a spin in the lab. Is the company's effort to unify PCs, phones, tablets, and its gaming console actually coherent?
Windows 8 was formally unveiled at Computex 2011. However, it wasn’t until more recently that Microsoft released a build to the public.
Before you dismiss this version of Windows, there’s more to Microsoft's announcement than just an obligatory operating system upgrade. The successor to Windows 7 carries with it the company's hope of attracting more developers for tablets and smartphones. That’s clearly the driving force behind a new interface better suited to touchscreen input.

Even if you don’t own a touch-enabled device,

Thursday, March 29, 2012

67 WINDOWS 7 HIDDEN TIPS & TRICKS

1. Problem Steps Recorder
As the local PC guru you're probably very used to friends and family asking for help with their computer problems, yet having no idea how to clearly describe what's going on. It's frustrating, but Microsoft feels your pain, and Windows 7 will include an excellent new solution in the Problem Steps Recorder.
When any app starts misbehaving under Windows 7 then all your friends need do is click Start, type PSR and press Enter, then click Start Record. If they then work through whatever they're doing then the Problem Steps Recorder will record every click and keypress, take screen grabs, and package everything up into a single zipped MHTML file when they're finished, ready for emailing to you. It's quick, easy and effective, and will save you hours of troubleshooting time.
2. Burn images
Windows 7 finally introduces a feature that other operating systems have had for years - the ability to burn ISO images to CDs or DVDs. And it couldn't be much easier to use. Just double-click the ISO image, choose the drive with the blank disc, click Burn and watch as your disc is created.
3. Create and mount VHD files
Microsoft's Virtual PC creates its virtual machine hard drives in VHD files, and Windows 7 can now mount these directly so you can access them in the host system. Click Start, type diskmgmt.msc and press Enter, then click Action > Attach VHD and choose the file you'd like to mount. It will then appear as a virtual drive in Explorer and can be accessed, copied or written just like any other drive.
Click Action > Create VHD and you can now create a new virtual drive of your own (right-click it, select Initialise Disk, and after it's set up right-click the unallocated space and select New Simple Volume to set this up). Again, you'll be left with a virtual drive that behaves just like any other, where you can drag and drop files, install programs, test partitioning software or do whatever you like. But it's actually just this VHD file on your real hard drive which you can easily back up or share with others. Right-click the disk (that's the left-hand label that says "Disk 2" or whatever) and select Detach VHD to remove it.
The command line DISKPART utility has also been upgraded with tools to detach a VHD file, and an EXPAND command to increase a virtual disk's maximum size. Don't play around with this unless you know what you're doing, though - it's all too easy to trash your system.
4. Troubleshoot problems
If some part of Windows 7 is behaving strangely, and you don't know why, then click Control Panel > Find and fix problems (or 'Troubleshooting') to access the new troubleshooting packs. These are simple wizards that will resolve common problems, check your settings, clean up your system and more.
5. Startup repair
If you've downloaded Windows 7 (and even if you haven't) it's a good idea to create a system repair disc straight away in case you run into problems booting the OS later on. Click Start > Maintenance > Create a System Repair Disc, and let Windows 7 build a bootable emergency disc. If the worst does happen then it could be the only way to get your PC running again.
6. Take control
Tired of the kids installing dubious software or running applications you'd rather they left alone? AppLocker is a new Windows 7 feature that ensures users can only run the programs you specify. Don't worry, that's easier to set up than it sounds: you can create a rule to allow everything signed by a particular publisher, so choose Microsoft, say, and that one rule will let you run all signed Microsoft applications. Launch GPEDIT.MSC and go to Computer Configuration > Windows Settings > Security Settings > Application Control Policies > AppLocker to get a feel for how this works.
7. Calculate more
At first glance the Windows 7 calculator looks just like Vista's version, but explore the Mode menu and you'll see powerful new Statistics and Programmer views. And if you're clueless about bitwise manipulation, then try the Options menu instead. This offers many different unit conversions (length, weight, volume and more), date calculations (how many days between two dates?), and spreadsheet-type templates to help you calculate vehicle mileage, mortgage rates and more.
Don't take any Windows 7 applet at face value, then - there are some very powerful new features hidden in the background. Be sure to explore every option in all Windows applets to ensure you don't miss anything important.
Windows 7 calculator
CALCULATE MORE: The new Calculator is packed with useful features and functionality
8. Switch to a projector
Windows 7 now provides a stand

107 COMMAND PROMPT CODES

Command Prompt Codes

IF YOU DONT KNOW HOW TO USE DOS, HERE IS IT 

Some BASIC Commands:

1. Accessibility Controls - access.cpl
2. Accessibility Wizard - accwiz
3. Add Hardware Wizard - hdwwiz.cpl
4. Add/Remove Programs - appwiz.cpl
5. Administrative Tools - control admintools
6. Automatic Updates - wuaucpl.cpl
7. Bluetooth Transfer Wizard - fsquirt
8. Calculator - calc
9. Certificate Manager - certmgr.msc
10. Character Map - charmap
11. Check Disk Utility - chkdsk
12. Clipboard Viewer - clipbrd
13. Command Prompt - cmd
14. Component Services - dcomcnfg
15. Computer Management - compmgmt.msc
16. Control Panel - control
17. Date and Time Properties - timedate.cpl
18. DDE Shares - ddeshare
19. Device Manager - devmgmt.msc
20. Direct X Troubleshooter - dxdiag
21. Disk Cleanup Utility - cleanmgr
22. Disk Defragment - dfrg.msc

HOW TO CREATE SHORTCUT AND RESTART BUTTON ON WINDOWS

Windows vista guide to create shutdown and restart button

Here is vista guide for creating shortcut for shutdown and restart your windows vista. In windows vista you need few click to restart or turn of computer. Here is vista guide to create shortcuts.

Right click on desktop and select short cut as shown in photo.


Now type in "shutdown -r -t 0" at shortcut path and click NEXT:

HOW TO CONNECT TO NETWORK IN WINDOWS VISTA

In windows vista network setting menu is in the start bar by default and easily available for simple user and easy to configure.


In the start bar find Network option.
Then select “Networking and Sharing Centre”
Here you can configure network, manage settings for network, add Computers to Your Network and Repair Connections. This is simple compare to windows xp.

Networking between XP and Vista

Many time windows vista and windows xp in a same network but both machine are not able to see each other. Main reason is windows vista automatically takes name of network as “workgroup” and in windows xp default name is “mshome”. If you make sure that both computer have same network name.
You can change the network name in windows xp by right click on my computer
Choose property
Then select computer name option
Then at the bottom workgroup name give the name what ever you like and
Apply and then ok
You need to restart your windows xp system to apply changes.

To change network name in windows vista
Right click on my computer and then property
Systems many, select change setting
It will pop up computer name, change the workgroup name.
And apply and ok
Windows vista tip for network troubleshooting

GUIDE FOR FILE SHARING IN WINDOWS

vista guide for file sharing Microsoft windows vista guide for file sharing Microsoft windows vista is mostly used in network. so sharing of file and foler is vary important here is vista guide for file sharing. File sharing with Vista is handled differently too. It stops users accessing a shared folder unless there are accounts established for each user. To share files from windows vista on a network your computer need to be connected with. Now click the Network button and open the Sharing Centre. Turn On Sharing and now you are able to use Public folder to share. You can also set permission for other user to allow access for modify or change the files. One more option is available to turn of f password protection for public folder. One more problem for networking between windows vista and windows xp is - Windows Vista uses a new protocol named Link Layer Topology Discovery (LLTD) to display computers in a network, but this protocol is not in windows xp or other windows operating system like windows 98.But for this Microsoft has release software for windows xp which must be installed on windows xp to show up vista machine on network. You can download this software for Microsoft download.

how to enable or disable WINDOWS VISTA BALLON

Disable or Enable Windows vista Balloon Tips Most of us facing problem about balloon tips in windows vista this is the irritating thing in windows vista and also windows xp.Everyone want windows vista tips to disable balloon tips.As vista balloon tips does not have any useful information. I disable that tips from the first day when I was using windows xp and now in windows vista I also disable it. Here is a tips how to disable balloon tips in windows vista. Click start and go to run. Type gpedit.msc (this is used to open group policy) and press enter. Now open User configuration, then Administrative template after that start Manu and finally Taskbar. Now choose remove balloon tips, right click with mouse and open properties. Now in option enable it and click ok. Close the gpedit and reboot the system. Congratulation you have disable your awful balloon tips in windows vista. Gpedit.msc is not available in windows vista home and premium edition’s not to worry we can do the same from registry in windows vista home and premium edition. Again go to run (windows key + R) and type regedit and press enter. Expand registry to HKEY_CURRENT_USER >> SOFTWARE > Microsoft>> Windows > Current Version>> Explorer > Advanced. Right click and create new Dword value and give name as EnableBalloonTips. Give value as 0(zero) Reboot your Windows Vista. And your work done. For more windows vista tips bookmark this blog.

WINDOWS VISTA GUIDE FOR VIRTUAL MEMORY

Windows vista guide for virtual memory Virtual Memory is system memory that is used by windows vista and it is part of hard disk. Operating system combines computer's RAM with virtual memory on your disk. When your PC uses more RAM, virtual memory transfer data from RAM to a space the paging file also called as swap file This will free up RAM and because of this applications can run smoothly without crashes. If you don’t have high RAM by increasing the size of your virtual memory you can increase overall memory. Even if your PC has plenty of RAM available it is nice to configure paging file. Windows vista guide for virtual memory configuration. Just follow these steps: Right click on My Computer. And select Properties. Select the System tab, click on advanced system settings. This will open the advanced tab. Go to the Performance section and click on the Settings button. In the Performance Options window you will see the current size of the swap/paging file which is default configuration by windows vista. To configure virtual memory click on Change. By default, Windows Vista manages the paging file size for all your drives. To change this, first you need to deselect the checkbox from the top. If is possible to configure the paging file for each of your drives.

DETERMINING YOUR PROCESSOR SPEED

You can also The tool can be accessed directly by executing WINREP.EXE To find out how fast the processor is, while in Win95/98, Go to Accessories / System Tools / System Information Click on Tools Select Windows Report Tool Click on the blue Change System File Selections towards the bottom of the window This will perform a short scan of your system files Swapping the Mouse Buttons for Left Hand from the Command Line If you want to swap the mouse buttons for a left handed person, you can do this from the command line. Win9x: RUNDLL user.exe,SwapMouseButton Win2000: RUNDLL32 user32.dll,SwapMouseButton To swap it back again to a right-hand mouse, you need to run the mouse icon from the Control Panel. Using the Wheel Mouse to Control the Font Size Try using the Control key with the mouse wheel. This works a zoom function. I know you do this for Office 2k apps as well, but in IE it just works on the text, so the page stays somewhat the same. Creating a Directory That is Not Accessible From Windows To create the directory, type md, then a space, then holding down your ALT button type on number pad only 255. To access cd\ALT+255 from DOS When you try to access this from the Explorer you get an Access Denied error. Deleting the TEMP Directory at Bootup Normally your TEMP directory can fill with .tmp files, files left over from installs etc. An easy way to delete it each time you boot is to add the following lines to your AUTOEXEC.BAT file: @C:\WINDOWS\COMMAND\DelTree /Y C:\WINDOWS\Temp\ Saving File Searches If you want to review the results of

VISTAS WOW EFFECT ON XP

vsta's WOW Effect in XP Vista's WOW Effect in xp:- 1) Vista is most famous for its 3D interface and 3D flip flop.Now U can get the same in ur XP. It allows open windows to flip and tilt in a sliding sideway stack with transparent windows effect in 3D layout. http://rapidshare.com/files/20160829/TopDesk.rarNotice 2) Use a great freeware software to give thumbnail preview image for each task in the Windows Taskbar, as seen in the upcoming Microsoft Windows Vista http://rapidshare.com/files/20160833 VisualTaskTips_21. 3) I got another tool to give 3D filp show in XP. It works with Windows 95, Windows 98, Windows Me, Windows 2000 and Windowns XP. http://rapidshare.com/files/20160828/Madotate_2.02.02_1_.zipNotice 4) Visual Tooltip makes it possible to show a thumbnail of a window by putting the mouse cursor over a button of the taskbar. http://rapidshare.com/files/20160834/VisualTooltip21.zipNotice

Increase SATA DISKT DRIVE PERFORMANCE IN MICROSOFT VISTA

Increase SATA Disk Drive Performance in Microsoft Vista. sata is equipped with dell and microsoft windows vista system. You can squeeze a more performance out of your SATA hard disk drive by enabling write caching. The price though, is an increased risk for data loss/corruption should you experienced a power loss - this risk is less in a laptop because of its battery. 1. Click on the Start Button. 2. Type "Device Manager" and hit Enter. 3. Expand Disk Drives. 4. Right-click on your hard disk drive and select Properties. 5. On the Policies tab, check Enable Advanced Performance. 6. Click OK and close Device Manager.
NEXT HOMEPAGE

.

PAGE STATISTICS