
As time has evolved over this last decade from 2001 to 2010, our
everyday use of computers has increased. We rely on them for more than
ever before, and trying to keep them up to date and running smoothing
can prove to be more of a chore than actually using it and enjoying it.
Regardless if we overlook the general maintenance on our computers, it
can prove to be as bad, and as expensive, as if we neglect doing the
general maintenance on our cars. The problem is in these days of
economic crisis, we have less money
to spend to have professionals do the work on our computers, and we
take it upon ourselves to try to maintain them and even fix them. I'm
here to give you some general do's and don'ts to avoid any severe
mistakes that could lead to you being without your computer for a few
days, while your local professional fixes your mistakes.
1. Do get yourself a can of compressed air, or a shop vac
and clean the dust out of your pc once a month. This helps keep the
fans clean and functiong properly, it also makes sure your system is
just clean and running smoothly. It fairly easy and not a lengthy
process to pop off two screws, remove the side cover and finish rather
quickly.
Don't suck up half your computer wires if you choose to use a shop vac. Just be smart and careful and keep your eye on wires. Would suck to have to dig your processor out of the bottom of the shop vac.
2. Do
Showing posts with label TROUBLESHOOTING. Show all posts
Showing posts with label TROUBLESHOOTING. Show all posts
Friday, July 20, 2012


Tuesday, May 1, 2012
10 reasons why PCs crash
 Fatal error: the system has become unstable or is busy," it says. "Enter
to return to Windows or press Control-Alt-Delete to restart your
computer. If you do this you will lose any unsaved information in all
open applications."
Fatal error: the system has become unstable or is busy," it says. "Enter
to return to Windows or press Control-Alt-Delete to restart your
computer. If you do this you will lose any unsaved information in all
open applications."You have just been struck by the Blue Screen of Death. Anyone who uses Mcft Windows will be familiar with this. What can you do? More importantly, how can you prevent it happening?
1 Hardware conflict
The number one reason why Windows crashes is hardware conflict. Each hardware device communicates to other devices through an interrupt request channel (IRQ). These are supposed to be unique for each device.
For example, a printer usually connects internally on IRQ 7. The keyboard usually uses IRQ 1 and the floppy disk drive IRQ 6. Each device will try to hog a single IRQ for itself.
If there are a lot of devices, or if they are not installed properly, two of them may end up sharing the same IRQ number. When the user tries to use both devices at the same time, a crash can happen. The way to check if your computer has a hardware conflict is through the following route:
* Start-Settings-Control Panel-System-Device Manager.
Saturday, April 21, 2012
Solution For Long Beep Problem
Solving Long Beep No Display Problem
Sometimes we will face this Long beep no display error. This
particular problem is very easy to solve. Actually this is not the system
common problem. But this post is only for home users to solve this small
problem.
Sometimes systems will generate some beeps for showing their error. There are more than 5 beep codes, what the problem is system facing? Maximum all are faced with long beep error only. Long beep error comes from motherboard speaker.
To solve this particular problem, you check your RAM. Is it
loose contact or failure? Open your CPU left side door and unlock the RAM
slots, remove and clean the RAM and reinsert the RAM for 4 to 5 times to solve
this problem. After you check the RAM, if problem will not be solved, then
change or insert New RAM to solve this problem.
Thursday, April 19, 2012
Forgot Windows 7 Password?

Before we find a certain solution to unlock the forgotten Windows 7 administrator password, we need to know the reasons why they were forgotten or lost. Thus in the future or after we successfully unlock the password, we then can avoid similar problem as possible as we can.
Reasons:
1. The Windows 7 password is difficult to remember, long, arbitrary and complex.
2. Frequently changing the password.
3. Having long time away from the computer.
4. Got computer hacked by others etc.
5. Or you are trying to bypass other's password
After we get to know how we forgot or lost our Windows 7 password, we now can start to unlock password Windows 7 with purpose. Step-by-step tutorials on how to unlock Windows 7 admin password:
Solution 1: Use Windows 7 built-in Administrator Account.
You may not know the Windows 7 built-in Administrator account which has full privilege over the computer is without password protected by default. This is because it is hidden so that you cannot notice of it. Therefore, we can unlock password Windows 7 with it if no change to its default settings.
Solution 1:
1. Start computer and then press “Ctrl+Alt+Delete” twice at Windows Login Screen.
Wednesday, April 18, 2012
What Is Cmos?
Full Details About CMOS
My blog is
getting so many keywords related to CMOS BIOS. So I want to give full details
about CMOS. Lot of users are trying to know all details about CMOS. So this
article is about CMOS and its functions.
CMOS full form is Complementary Metal Oxide Semiconductor. Which is one of the very important chip on Motherboard and it has predefined software. This software checks all the devices connected to Motherboard when system starts and it maintains the Date and Time.
There are three
CMOS BIOS companies. They are Award, AMI and Phoenix. Award and AMI chips will
see on old Motherboards like P-III or P-IV systems. Phoenix chip will see all
latest motherboards.
Main menu of
Phoenix bios gives you full information about your system, Such as bios
version, processor type, processor specifications, RAM capacity, language
information, Date and Time.
Tuesday, April 17, 2012
Removing Boot Sector Virus
Many computer users might have faced the message “ BOOT
SECTOR VIRUS. PROCEED Y/N? “ during Windows installation thus not allowing to
install the operating system or you to boot operating system if already
installed. Some motherboard manufacturers have put boot sector virus protection
in BIOS. Boot sector is the first sector which contains DOS boot sector or commonly
known as MBR (Master Boot Record) of the hard disk drive or floppy. MBR
contains information about your hard drive partitions details and from where
the operating system has to boot.
If the boot sector virus protection is enabled in the BIOS,
it won’t allow you to install operating system because during installation the
operating system writes boot code on MBR of the hard disk drive. If you are
trying to write anything on MBR, it will consider as virus. To solve this, you
have to disable boot virus protection in BIOS
Deleting Virus From System Volume Information.
System Volume Information is a hidden folder. It is a part of System
Restore that stores details about system restoration set points. All the
partitions or drives on your
computer have this folder. Follow the simple steps to delete the virus
or trojan infected files located inside System Volume Information folder
manually if your existing antivirus did not do the job for you.
Right-click on "MY COMPUTER" and go to "PROPERTIES" to open "SYSTEM PROPERTIES" window or go to "START" and click on "RUN" or hold "WINDOWS" key and press "R" to open RUN window and type "sysdm.cpl" and press "ENTER" key. In the "SYSTEM PROPERTIES" window select "SYSTEM RESTORE" tab and select or check the "TURN OFF SYSTEM RESTORE ON ALL DRIVES" option. You will get the confirmation window to select "YES" or "NO". Click "YES" to remove files stored in System Volume Information folder thus making your system free from virus or trojan.

Right-click on "MY COMPUTER" and go to "PROPERTIES" to open "SYSTEM PROPERTIES" window or go to "START" and click on "RUN" or hold "WINDOWS" key and press "R" to open RUN window and type "sysdm.cpl" and press "ENTER" key. In the "SYSTEM PROPERTIES" window select "SYSTEM RESTORE" tab and select or check the "TURN OFF SYSTEM RESTORE ON ALL DRIVES" option. You will get the confirmation window to select "YES" or "NO". Click "YES" to remove files stored in System Volume Information folder thus making your system free from virus or trojan.

How To Remove Windows Security Alert From Status Bar Tray
Follow the procedure to turn off automatic windows updates
and to remove Windows security alert from status bar tray.

" MSCONFIG " without doubles quotes and press ENTER key or click OK button to
open SYSTEM CONFIGURATION UTILITY.
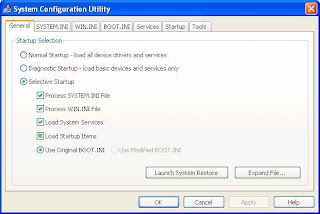
Click on SERVICES tab and in the list look for the name SECURITY CENTER and deselect.
 Now click OK. You will be asked to RESTART the computer
for changes to be affected.
Now click OK. You will be asked to RESTART the computer
for changes to be affected.


To remove Windows automatic updates:
Monday, April 16, 2012
LAPTOP SCREEN SUDDENLY GOES BLANK

What to Do When Laptop Screen Goes Black Suddenly?
Figuring out laptop problems and especially laptop screen problems is not an easy task. There are more than one reasons, which may lead to a laptop screen going black. There are several software and hardware issues which may do this. I shall identify the most likely ones, among them, for your perusal in the following lines. Here is what you need to do when you find the screen of your laptop going blank suddenly. We will start with software issues, followed by hardware related ones. ..
Saturday, April 14, 2012
PC REPAIR SURVEY, WHAT CAN YOU FIX?
PC Repairs Surrey has become a massive business in the world of
personal computers. Even though a good quantity of pc problems may be
repaired in your own home, a Pc repair service will need to take care of
the rest. The difficulties that are simple to repair are usually
software or registry issues and can normally end up being fixed by
getting a treatment for the issue on-line.
Hardware problems, in contrast, are harder to correct as a professional PC Repairs Guildford will need to manage delicate personal computer parts. Should you be new to computers, it's imperative you contact a Pc repair technician since they are educated to handle computers. Some PC Repairs Surrey services provide their services over the telephone. Before you call a technician, ensure that you backup your personal computer to retain any kind of vital info.
Where do you go for PC Repairs Surrey? If your laptop or pc breaks when you are within the U.K. you will instantly have to seek out the best PC Repairs Surrey shop within the region. Forgot about the time on Large Ben since time won't matter without your laptop or PC helping you to get your job carried out. Check out a couple of the best PC Repairs Surrey shops where you are able to get the very best technical support and people with real knowledge that can solve all kinds of computer or laptop problems.
How several days can you make it without your pc?
Hardware problems, in contrast, are harder to correct as a professional PC Repairs Guildford will need to manage delicate personal computer parts. Should you be new to computers, it's imperative you contact a Pc repair technician since they are educated to handle computers. Some PC Repairs Surrey services provide their services over the telephone. Before you call a technician, ensure that you backup your personal computer to retain any kind of vital info.
Where do you go for PC Repairs Surrey? If your laptop or pc breaks when you are within the U.K. you will instantly have to seek out the best PC Repairs Surrey shop within the region. Forgot about the time on Large Ben since time won't matter without your laptop or PC helping you to get your job carried out. Check out a couple of the best PC Repairs Surrey shops where you are able to get the very best technical support and people with real knowledge that can solve all kinds of computer or laptop problems.
How several days can you make it without your pc?
Tuesday, April 10, 2012
5 Common Disk Burning Mistakes And How To Avoid Them
Though some people speculate that DVDs and optical drives in general
are on their way out, the truth is that compact discs and DVDs will
probably be with us for awhile. One of the major problems with burning
DVDs is that they're often difficult to create reliably without any
problems. There are plenty of mistakes that users commonly make that
waste discs and time when burning DVDs. Here are the top five DVD
burning missteps as well as how to avoid them.
Setting The Speed Too High
DVD burners
and multipurpose optical drives are rather amazing creations when you
think about it, capable of writing millions of bytes of data per second
to discs flawlessly under most circumstances. Still, they are operating
at thousands of revolutions per minute and aren't completely infallible.
To ensure that your DVD replication doesn't result in errors, select a
write speed of 8X.
Using Deficient Media
Not all blank discs
are creating equally, and using lousy DVD-Rs or DVD-RWs is the surest
way to create a disc that won't work when you pop it into the tray the
next time around. To avoid this annoying scenario, make sure that you
only use the best DVDs you can find. Spending a little extra on optical media can save you a lot of frustration further on down the line.
Forgetting to Verify Your Disc
5 Tips To Do It YourSelf; Personal Computer Restore
1) An extremely fundamental but extremely useful tip when managing
personal computer difficulties is the Control-Alt-Delete scorching key
combo. Hold down the Manage and Alt tips simultaneous after which strike
the particular erase switch. When completed as soon as, this can open
the actual Job Supervisor within house windows, allowing you to finish
virtually any deterioration applications. If done two times, it'll
reactivate the computer, with any luck , resolving the mistake inside
the restart.
2) Internet sites will certainly usually set up info in your pc with out the knowledge, generally referred to as malware. This really is what has occurred should you find which your house page offers altered into a various website. In order in order to avoid this issue, it's best to be able to improve your anti-spy computer software often. You'll be able to effortlessly change your home page back, but be aware of the particular backlinks an individual click about different websites.
3) Among the more frustrating things regarding PCs can be determining how to un-install the program which is defective or even that's just taking on an excessive amount of room. The majority of working techniques permit you to access the actual control panel from the begin food selection. In the control panel click applications (Within Experience, that says Add/Remove Programs), and after that select Uninstall a System. At this point you can see the different programs and merely click on Un-install. This might take a couple of minutes, but will eliminate the particular program.....
2) Internet sites will certainly usually set up info in your pc with out the knowledge, generally referred to as malware. This really is what has occurred should you find which your house page offers altered into a various website. In order in order to avoid this issue, it's best to be able to improve your anti-spy computer software often. You'll be able to effortlessly change your home page back, but be aware of the particular backlinks an individual click about different websites.
3) Among the more frustrating things regarding PCs can be determining how to un-install the program which is defective or even that's just taking on an excessive amount of room. The majority of working techniques permit you to access the actual control panel from the begin food selection. In the control panel click applications (Within Experience, that says Add/Remove Programs), and after that select Uninstall a System. At this point you can see the different programs and merely click on Un-install. This might take a couple of minutes, but will eliminate the particular program.....
Monday, April 9, 2012
How To Refresh Your Pc
We have all been there. Your computer is slowing down, is old(ish)
and you are thinking about changing it for a new model. Do you really
need to spend hundred of pounds on a new shiny model or is there a
cheaper way to reclaim your computers lost performance?
So before you go spending all that money lets try to refresh your PC. Because most people run some form of Windows we will concentrate on that.
1. Run a complete virus and spyware scan. I can recommend Avast Free (antivirus) and Spybot -Search and Destroy (spyware) for this. This area is of course personal choice but I would recommend these to any of my clients.
2. Get rid of any old programs you have installed but hardly use. Word of warning here - only get rid of programs that you have installed and you know what they do. If you don't know what a specific program does then my advice is to leave it alone or you could mess up your system.
3. Use disk clean up. This is a tool within Windows that helps you to free up hard disk space by deleting unnecessary files. It can be found by right clicking on the icon for your computers hard disk. The tool itself is safe but there are three items you need to be wary of - Office Setup files, compress old files and Hibernation File Cleaner. Personally I would leave these items well alone just in case.
4. Defragmentation. Your windows hard disk is like a filing cabinet in the way it stores data. Over time some files will be moved into other locations or worse, files will get split up and stored in different locations. When this happens it takes the operating system longer to retrieve all the parts of a file and therefore slows down ...
So before you go spending all that money lets try to refresh your PC. Because most people run some form of Windows we will concentrate on that.
1. Run a complete virus and spyware scan. I can recommend Avast Free (antivirus) and Spybot -Search and Destroy (spyware) for this. This area is of course personal choice but I would recommend these to any of my clients.
2. Get rid of any old programs you have installed but hardly use. Word of warning here - only get rid of programs that you have installed and you know what they do. If you don't know what a specific program does then my advice is to leave it alone or you could mess up your system.
3. Use disk clean up. This is a tool within Windows that helps you to free up hard disk space by deleting unnecessary files. It can be found by right clicking on the icon for your computers hard disk. The tool itself is safe but there are three items you need to be wary of - Office Setup files, compress old files and Hibernation File Cleaner. Personally I would leave these items well alone just in case.
4. Defragmentation. Your windows hard disk is like a filing cabinet in the way it stores data. Over time some files will be moved into other locations or worse, files will get split up and stored in different locations. When this happens it takes the operating system longer to retrieve all the parts of a file and therefore slows down ...
Thursday, March 29, 2012
HOW TO USE DISK UTILITY IN VISTA
Windows Vista guide how to use disk utility
In windows vista there is a disk utility which checks your hard disk for error, bad sectors and recover information. You can troubleshoot your hard disk in windows vista. this is useful vista guide to check your hard disk.
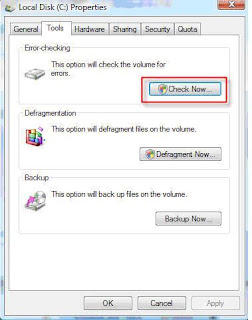
In order to check a disk in Windows Vista, go to my computer and select the drive you want to check right-click on the disk and choose Properties as shown in below snap.

On the Properties page, click the Tools tab and click Check Now.
In windows vista there is a disk utility which checks your hard disk for error, bad sectors and recover information. You can troubleshoot your hard disk in windows vista. this is useful vista guide to check your hard disk.
In order to check a disk in Windows Vista, go to my computer and select the drive you want to check right-click on the disk and choose Properties as shown in below snap.
On the Properties page, click the Tools tab and click Check Now.
Tuesday, March 27, 2012
Windows vista slow start up proble and solution:-
Windows vista slow start up proble and solution:-Facing lots of problem for Windows Vista slow start up. This is common for new operating system.
Now many people facing problem about windows vista slow start up and windows vista takes to long even after entering password screen to boots up.
It may some time show message like Errors: AFEE32.EXE
And also find Server Busy
The possible reason and solution are
Most common reason is Trojan virus called afee32.exe = TAJEAWE.EXE .This is a backdoor Trojan. However these are just some of its files, the virus's real name is "W32 Randex". This Trojan using a port back door. You can find explanation about this virus at
http://www.symantec.com/security_response/writeup.jsp?docid=2003-081213-3232-99&tabid=1
Try running WINDOWS DEFENDER or Windows OneCare 1.5 to isolate the file.
Use MS Malicious Virus Removal Tool, it will remove this virus according to MS.
http://www.microsoft.com/security/malwareremove/default.mspx
Now if your system is not virus infected than follow these steps
Use msconfing on run and disable unnecessary start up program.
Now many people facing problem about windows vista slow start up and windows vista takes to long even after entering password screen to boots up.
It may some time show message like Errors: AFEE32.EXE
And also find Server Busy
The possible reason and solution are
Most common reason is Trojan virus called afee32.exe = TAJEAWE.EXE .This is a backdoor Trojan. However these are just some of its files, the virus's real name is "W32 Randex". This Trojan using a port back door. You can find explanation about this virus at
http://www.symantec.com/security_response/writeup.jsp?docid=2003-081213-3232-99&tabid=1
Try running WINDOWS DEFENDER or Windows OneCare 1.5 to isolate the file.
Use MS Malicious Virus Removal Tool, it will remove this virus according to MS.
http://www.microsoft.com/security/malwareremove/default.mspx
Now if your system is not virus infected than follow these steps
Use msconfing on run and disable unnecessary start up program.
Windows vista printer installation problem and troubleshooting.
Windows vista facing problem with printer installation, some may be due to printer drivers or some problem due to windows vista configuration settings.
You want to use Windows Vista and you want to be able to print to a
network printer, you are going to have to use UAC. You turned it off.
Turn it back on. You are using the in-built “Administrator” account?
Log-out and log-in as a normal admin.
. Microsoft says you have to use UAC to get a printer installed. If you do not use it, you get this ugly message:
“Windows cannot connect to the printer. The specified print monitor is unknown.”
This error message shows up is not clear, it has nothing to do with the
printer you choose to use or the process you take. This particular
message is displayed when trying to add a printer via the wizard:
WINDOWS VISTA TROUBLESHOOTING TIPS
Windows Vista Tricks Indexing Options
-->Click on the Start Button and enter Indexing Options. Hit Enter and the Indexing Options should load.
-->Click on the Modify button, followed by Show all locations.
Scroll through the tree-view and uncheck all options except the Start Menu. Hit OK.
Note: For advanced users, you can also change other indexing options, like the file types to index, by clicking on the Advanced button.
Adjust Vista Glass Window Border
- Right click on your desktop and select Personalize.
- Click -> Windows Color and Appearance.
- Click -> Open Classic Appearance Properties
- Click -> Advanced. - Select -> Border Padding in the Items drop down box.
- Increase or decrease your border size in windows vista.
- Hit OK.
Stop Applications That Auto-start On Startup - Windows Vista Troubleshooting 2
Windows Vista works in the background to automatically index all the
files in the Start Menu, user profile folders and files setup for
offline access by default. If you havemany files in these locations and
the files change often, the indexing service may slow down your system's
performance. Unlike Windows XP, Vista now allows you toeasily tweak the
indexing service following the steps below. It is recommended that you
disable indexing for the other locations other than the Start Menu for
maximumperformance. Bear in mind that while this tweak speeds up your
overall system performance, it will also slow you down when searching
for files in those locations.This Windows Vista Troubleshooting tips also imporve windows vista speed.
-->Click on the Start Button and enter Indexing Options. Hit Enter and the Indexing Options should load.
-->Click on the Modify button, followed by Show all locations.
Scroll through the tree-view and uncheck all options except the Start Menu. Hit OK.
Note: For advanced users, you can also change other indexing options, like the file types to index, by clicking on the Advanced button.
Adjust Vista Glass Window Border
- Right click on your desktop and select Personalize.
- Click -> Windows Color and Appearance.
- Click -> Open Classic Appearance Properties
- Click -> Advanced. - Select -> Border Padding in the Items drop down box.
- Increase or decrease your border size in windows vista.
- Hit OK.
Stop Applications That Auto-start On Startup - Windows Vista Troubleshooting 2
HOW TO CREATE A RECOVERY DISK IN WINDOWS VISTA
Windows Vista is powerful operating system but if you facing some
serious virus problem or due to some major failure. You need to run a
recovery routine to save your system to be reformatted. You require
creating windows vista recovery disk
Vista steps to create Windows Vista Recovery Disk
Before creating disk consider this points.
Consider creating a partition on your hard drive specifically for Windows Vista recovery.
Always download the latest drivers for your hardware and software prior to creating a recovery disk
Keep Windows Vista installation disk with you.
Step One
Start Windows Vista and log on to the administrator account. This will make it easier to get access to all of your most important files.
Step Two
Place a blank CD-R or DVD-R into the appropriate optical drive. There is no need to format this disk.
Step Three
Consider creating a folder on your desktop in which to place all of your most important files. This will make it easier to create a simple recovery disk later.
Vista steps to create Windows Vista Recovery Disk
Before creating disk consider this points.
Consider creating a partition on your hard drive specifically for Windows Vista recovery.
Always download the latest drivers for your hardware and software prior to creating a recovery disk
Keep Windows Vista installation disk with you.
Step One
Start Windows Vista and log on to the administrator account. This will make it easier to get access to all of your most important files.
Step Two
Place a blank CD-R or DVD-R into the appropriate optical drive. There is no need to format this disk.
Step Three
Consider creating a folder on your desktop in which to place all of your most important files. This will make it easier to create a simple recovery disk later.
Blocking Device Installation In Windows Vista
These settings are located in
Computer Configuration\Administrative Templates\System\Device Installation. Even you can do this from registry setting and also from windows vista group policy.
This windows vista setting allows / restricts devices from being installed on computers within your network. With this level of control you will be able to establish and enforce policy settings that can block access to USB drivers, CD-RW or DVD-RW drivers and other types of removable media.
By this you can create a policy that says whether or not you can put a USB hard drive in your machine. I can set it up so it’s only read access. Lots of corporations want people to use USB storage devices but don’t want them to take data out. Coupled with the intelligent firewall [in Vista], you can really block Internet access so machines are only used in the context and domain that you like.
Without control over the installation and use of removable devices, users can introduce viruses, worms, and other malicious applications using these media or user can steal important data.
Computer Configuration\Administrative Templates\System\Device Installation. Even you can do this from registry setting and also from windows vista group policy.
This windows vista setting allows / restricts devices from being installed on computers within your network. With this level of control you will be able to establish and enforce policy settings that can block access to USB drivers, CD-RW or DVD-RW drivers and other types of removable media.
By this you can create a policy that says whether or not you can put a USB hard drive in your machine. I can set it up so it’s only read access. Lots of corporations want people to use USB storage devices but don’t want them to take data out. Coupled with the intelligent firewall [in Vista], you can really block Internet access so machines are only used in the context and domain that you like.
Without control over the installation and use of removable devices, users can introduce viruses, worms, and other malicious applications using these media or user can steal important data.
Windows vista Basic Troubleshooting Tips.
Windows Vista Tips to enable Aero Cursors.
Vista Troubleshooting tips 1
Microsoft windows vista has included new aero cursors that is not turned on by default. To troubleshooting this in vista.Follow the steps below.
:Right click on your desktop and select personalize.Click on the mouse cursors item to select a vista graphics different mouse cursor scheme.Change the scheme from none to Windows vista Aero.Click ok to see the new aero mouse cursors.
Kill Security center notification problem in Windows Vista Basic
Vista Troubleshooting tips 2:
Windows vista security center remind you all the time about anti virus. New easy way to disable the security center messages.Click on the Security Center/Windows Security Alerts logo in the system tray.Click change the way Security Center alerts me.Select I do not want notification messages from Security Center.
Use small icons size tip for Windows vista
Windows Vista Troubleshooting Tips large icon
The Windows vista icon size of the recently run programs list on the Start Menu is set to large by default. This is great if you like the large icons but it also cuts down on the number of recently run programs that can be displayed. Follow the steps below to give your Start Menu a cleaner look.

disable large icons problem
Right click on the start button and select properties.
Click on the customize button.
Scroll to the bottom of the list and remove the check from use large icons.
You can now also increase the number of recently run programs in vista that are displayed to something larger than 9.
Hit ok when you are finished.
Vista Troubleshooting tips 1
Microsoft windows vista has included new aero cursors that is not turned on by default. To troubleshooting this in vista.Follow the steps below.
:Right click on your desktop and select personalize.Click on the mouse cursors item to select a vista graphics different mouse cursor scheme.Change the scheme from none to Windows vista Aero.Click ok to see the new aero mouse cursors.
Kill Security center notification problem in Windows Vista Basic
Vista Troubleshooting tips 2:
Windows vista security center remind you all the time about anti virus. New easy way to disable the security center messages.Click on the Security Center/Windows Security Alerts logo in the system tray.Click change the way Security Center alerts me.Select I do not want notification messages from Security Center.
Use small icons size tip for Windows vista
Windows Vista Troubleshooting Tips large icon
The Windows vista icon size of the recently run programs list on the Start Menu is set to large by default. This is great if you like the large icons but it also cuts down on the number of recently run programs that can be displayed. Follow the steps below to give your Start Menu a cleaner look.
disable large icons problem
Right click on the start button and select properties.
Click on the customize button.
Scroll to the bottom of the list and remove the check from use large icons.
You can now also increase the number of recently run programs in vista that are displayed to something larger than 9.
Hit ok when you are finished.


Subscribe to:
Posts (Atom)