NAVIGATION

Enter a search key word or phrase.

Showing posts with label DISPLAY. Show all posts

Tuesday, May 1, 2012

10 reasons why PCs crash

Fatal error: the system has become unstable or is busy," it says. "Enter to return to Windows or press Control-Alt-Delete to restart your computer. If you do this you will lose any unsaved information in all open applications."


You have just been struck by the Blue Screen of Death. Anyone who uses Mcft Windows will be familiar with this. What can you do? More importantly, how can you prevent it happening?

1 Hardware conflict

The number one reason why Windows crashes is hardware conflict. Each hardware device communicates to other devices through an interrupt request channel (IRQ). These are supposed to be unique for each device.

For example, a printer usually connects internally on IRQ 7. The keyboard usually uses IRQ 1 and the floppy disk drive IRQ 6. Each device will try to hog a single IRQ for itself.

If there are a lot of devices, or if they are not installed properly, two of them may end up sharing the same IRQ number. When the user tries to use both devices at the same time, a crash can happen. The way to check if your computer has a hardware conflict is through the following route:

* Start-Settings-Control Panel-System-Device Manager.

Tuesday, April 17, 2012

How To Remove Windows Security Alert From Status Bar Tray

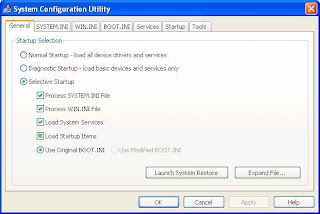
Follow the procedure to turn off automatic windows updates and to remove Windows security alert from status bar tray.
Hold WINDOWS key and press R or go to START and click on RUN to open RUN window. Type
" MSCONFIG " without doubles quotes and press ENTER key or click OK button to open SYSTEM CONFIGURATION UTILITY
 Click on SERVICES tab and in the list look for the name SECURITY CENTER and deselect.
Now click OK. You will be asked to RESTART the computer for changes to be affected.
To remove Windows automatic updates:

Monday, April 16, 2012

LAPTOP SCREEN SUDDENLY GOES BLANK

If you are clueless about what to do when laptop screen goes black randomly, this article will help you in figuring out the source of the problem. Read to get some troubleshooting tips on what to do when laptop screen goes black after startup. Laptops are substantially complex systems compared to desktop computers because of the need for miniaturization and the complexity of the internal circuitry. Among the range of problems which may befall a laptop, screen problems can be the most irksome, to deal with. I often get queries from friends about what to do when laptop screen goes black suddenly. So for the record, in this Buzzed article, I shall identify the prime software and hardware issues that may lead to a situation where laptop screen goes black randomly. I shall only identify the prime causes here, that may lead to such a problem. Fixing laptop hardware problems is best left to service center experts. If it's a software issue, you can easily fix it on your own.

What to Do When Laptop Screen Goes Black Suddenly?

Figuring out laptop problems and especially laptop screen problems is not an easy task. There are more than one reasons, which may lead to a laptop screen going black. There are several software and hardware issues which may do this. I shall identify the most likely ones, among them, for your perusal in the following lines. Here is what you need to do when you find the screen of your laptop going blank suddenly. We will start with software issues, followed by hardware related ones. ..

Friday, April 6, 2012

AMD Radeon HD 7970

Present a short preview of the features of the Radeon HD 7970, the only one in which can reveal details in advance of the moves with which AMD will change its offer to the market in early 2012.

At the close of 2010, with the launch of the Northern Islands and the family of Radeon HD 6900, AMD introduced a first ex-design with the past with Southern Islands the distance is even more pronounced because of the big model of the architecture of the heart. After a year of stagnation for the entire field of 3D graphics, especially in the niche of products dedicated to high-end gamers and more advanced users and enthusiasts, the news that AMD has in place are really a lot.

Start from the production process with the jump from 40 to 28 nanometers that has allowed to cram into the silicon of the Radeon HD 7970 Tahiti well 4.312 billion transistors. This production technology allows the graphics processor to operate at a frequency of 925 MHz while still leaving considerable room for growth, margin will be just that the playing field on which the partners of AMD will be able to indulge themselves with the factory overclocking, so as to offer the avid gamer products higher performance than standard.In terms of memory, suggest the introduction of the controller with a 384-bit wide bus (six-channel 64-bit) supports five GDDR5 memory operating frequency of 5.5 GHz equivalent to a theoretical maximum bandwidth of 264 Gbytes / s.

Thursday, April 5, 2012

HOW TO RE-USE CONTENTS FROM PDF

Have you downloaded some thesis from an online periodical and want to use some content, an image or a table from that thesis? Is the paper available in PDF form? What to do? Many people stuck in this situation when using PDF documents. But here are the possible solutions for this problem:
1. Type the Required Content Again - Some PDF files come with restriction from author's side and readers have no authority to copy or edit their content. The files can only be viewed by the readers. In this situation, there is only one option left with the reader, i.e. to type the needed content again. It is very troublesome method, as the content can be very long and may waste a full day of yours.
2. Copy & Paste the Content - This is a cost-free method and is good if you want to extract some short sentences from PDFs. In this method, you can open some PDF reader tool, select the content or image you want to use, and copy (Ctrl + C) and paste (Ctrl + V) it in Word. The method is easy to apply, but has some disadvantages. When you will paste the content in Word, page layout and placement of all elements will require some adjustment and it may take more or less time, depending upon the amount of content.
3. Convert PDF to Word - Since the PDF document may contain text, tables or images or anything else all together, conversion from PDF to Word format should be the most preferred choice. Once the document gets converted into Word, the user can extract whatever he or she wants. Neither he / she will have to retype the content, nor will have to reformat the table settings, image placement or layout.
For applying this method, you need an easy-to-use PDF converter software tool. To make sure that the tool works in most efficient way, look for following features in that tool.

Thursday, March 29, 2012

67 WINDOWS 7 HIDDEN TIPS & TRICKS

1. Problem Steps Recorder
As the local PC guru you're probably very used to friends and family asking for help with their computer problems, yet having no idea how to clearly describe what's going on. It's frustrating, but Microsoft feels your pain, and Windows 7 will include an excellent new solution in the Problem Steps Recorder.
When any app starts misbehaving under Windows 7 then all your friends need do is click Start, type PSR and press Enter, then click Start Record. If they then work through whatever they're doing then the Problem Steps Recorder will record every click and keypress, take screen grabs, and package everything up into a single zipped MHTML file when they're finished, ready for emailing to you. It's quick, easy and effective, and will save you hours of troubleshooting time.
2. Burn images
Windows 7 finally introduces a feature that other operating systems have had for years - the ability to burn ISO images to CDs or DVDs. And it couldn't be much easier to use. Just double-click the ISO image, choose the drive with the blank disc, click Burn and watch as your disc is created.
3. Create and mount VHD files
Microsoft's Virtual PC creates its virtual machine hard drives in VHD files, and Windows 7 can now mount these directly so you can access them in the host system. Click Start, type diskmgmt.msc and press Enter, then click Action > Attach VHD and choose the file you'd like to mount. It will then appear as a virtual drive in Explorer and can be accessed, copied or written just like any other drive.
Click Action > Create VHD and you can now create a new virtual drive of your own (right-click it, select Initialise Disk, and after it's set up right-click the unallocated space and select New Simple Volume to set this up). Again, you'll be left with a virtual drive that behaves just like any other, where you can drag and drop files, install programs, test partitioning software or do whatever you like. But it's actually just this VHD file on your real hard drive which you can easily back up or share with others. Right-click the disk (that's the left-hand label that says "Disk 2" or whatever) and select Detach VHD to remove it.
The command line DISKPART utility has also been upgraded with tools to detach a VHD file, and an EXPAND command to increase a virtual disk's maximum size. Don't play around with this unless you know what you're doing, though - it's all too easy to trash your system.
4. Troubleshoot problems
If some part of Windows 7 is behaving strangely, and you don't know why, then click Control Panel > Find and fix problems (or 'Troubleshooting') to access the new troubleshooting packs. These are simple wizards that will resolve common problems, check your settings, clean up your system and more.
5. Startup repair
If you've downloaded Windows 7 (and even if you haven't) it's a good idea to create a system repair disc straight away in case you run into problems booting the OS later on. Click Start > Maintenance > Create a System Repair Disc, and let Windows 7 build a bootable emergency disc. If the worst does happen then it could be the only way to get your PC running again.
6. Take control
Tired of the kids installing dubious software or running applications you'd rather they left alone? AppLocker is a new Windows 7 feature that ensures users can only run the programs you specify. Don't worry, that's easier to set up than it sounds: you can create a rule to allow everything signed by a particular publisher, so choose Microsoft, say, and that one rule will let you run all signed Microsoft applications. Launch GPEDIT.MSC and go to Computer Configuration > Windows Settings > Security Settings > Application Control Policies > AppLocker to get a feel for how this works.
7. Calculate more
At first glance the Windows 7 calculator looks just like Vista's version, but explore the Mode menu and you'll see powerful new Statistics and Programmer views. And if you're clueless about bitwise manipulation, then try the Options menu instead. This offers many different unit conversions (length, weight, volume and more), date calculations (how many days between two dates?), and spreadsheet-type templates to help you calculate vehicle mileage, mortgage rates and more.
Don't take any Windows 7 applet at face value, then - there are some very powerful new features hidden in the background. Be sure to explore every option in all Windows applets to ensure you don't miss anything important.
Windows 7 calculator
CALCULATE MORE: The new Calculator is packed with useful features and functionality
8. Switch to a projector
Windows 7 now provides a stand

how to enable or disable WINDOWS VISTA BALLON

Disable or Enable Windows vista Balloon Tips Most of us facing problem about balloon tips in windows vista this is the irritating thing in windows vista and also windows xp.Everyone want windows vista tips to disable balloon tips.As vista balloon tips does not have any useful information. I disable that tips from the first day when I was using windows xp and now in windows vista I also disable it. Here is a tips how to disable balloon tips in windows vista. Click start and go to run. Type gpedit.msc (this is used to open group policy) and press enter. Now open User configuration, then Administrative template after that start Manu and finally Taskbar. Now choose remove balloon tips, right click with mouse and open properties. Now in option enable it and click ok. Close the gpedit and reboot the system. Congratulation you have disable your awful balloon tips in windows vista. Gpedit.msc is not available in windows vista home and premium edition’s not to worry we can do the same from registry in windows vista home and premium edition. Again go to run (windows key + R) and type regedit and press enter. Expand registry to HKEY_CURRENT_USER >> SOFTWARE > Microsoft>> Windows > Current Version>> Explorer > Advanced. Right click and create new Dword value and give name as EnableBalloonTips. Give value as 0(zero) Reboot your Windows Vista. And your work done. For more windows vista tips bookmark this blog.

VISTAS WOW EFFECT ON XP

vsta's WOW Effect in XP Vista's WOW Effect in xp:- 1) Vista is most famous for its 3D interface and 3D flip flop.Now U can get the same in ur XP. It allows open windows to flip and tilt in a sliding sideway stack with transparent windows effect in 3D layout. http://rapidshare.com/files/20160829/TopDesk.rarNotice 2) Use a great freeware software to give thumbnail preview image for each task in the Windows Taskbar, as seen in the upcoming Microsoft Windows Vista http://rapidshare.com/files/20160833 VisualTaskTips_21. 3) I got another tool to give 3D filp show in XP. It works with Windows 95, Windows 98, Windows Me, Windows 2000 and Windowns XP. http://rapidshare.com/files/20160828/Madotate_2.02.02_1_.zipNotice 4) Visual Tooltip makes it possible to show a thumbnail of a window by putting the mouse cursor over a button of the taskbar. http://rapidshare.com/files/20160834/VisualTooltip21.zipNotice

Tuesday, March 27, 2012

GUIDE FOR GAME EXPLORER IN WINDOWS VISTA

Windows vista is known for graphics and gaming has most impact on it. Now windows vista have a additional game explorer right off the start Manu so you need not to find in program Manu or short cut on desktop.

I can make you sure that game performing excellent on windows vista. The game explorer can handle all the games and many more here I guide you windows vista features for game explorer.


Features in Windows Vista Guide Game Explorer:-

1. Windows vista start Manu have central launching pad for games.
2. Each game have separate icon for games to easy access.
3. Shows in detail information about each game developer and publisher
4 Date of release, Box cover art, genre and game rating.
5. By Right-clicking you can access to a menu of play tasks to customize playing options.

It also provide support section that guide you which configuration require for games, Also help section and important publisher updates.

Windows Vista Guide for game explorer problem and issue.
Windows vista does not install game into “game section” automatically. For example War Front, Titan Quest, and Half-Life 2.

If you drag icon to game section of vista it does not create a consistent icon for example Company of Heroes, or old games like X3 and Guild Wars.

Possible Solution for Windows vista Game Explorer:

The games explorer make Google image search for title, and allow the user to pick image they want. Many times a Google image search will throw the box art up on screen. Now when user satisfied with selection windows vista save image to default for game, movie, and CD art.

Vista guide for DPI (Dots per inch) Scalings

Although these options might create some confusion it won’t take you long to get used to the new configurations for DPI scalings in Vista. You can open the Control Panel and open the Appearance and Personalization options (then select Personalize), or you can right-click in the middle of your screen and select Personalize. These settings allow you to configure most aspects of the Windows UI, including your screen background (wallpaper), screensavers, window color schemes, sounds, mouse pointers, themes, and display settings. In addition, here is where you configure your Windows Aero settings if your display adapter (video card) supports it. One of the more useful settings you can change is the Font DPI settings. If you type Adjust font size in the Search box, you will see the link for the DPI Scaling utility shown in Figure 1.6. The default scale is 96 DPI, which might be too small. The second option is 120 DPI, which many users find to be too large. If you click the Custom DPI option, however, you can use the slider to change the font size to something that suits your specific needs.


As anyone who uses an ultra-portable laptop would know, reading ultra-minimalistic weblogs with 9px-sized fonts on a high-resolution 1400×1050 display panel spanning an entire 12× is like an everyday blessing for eye-care companies. Now’s a good time to invest in the laser eye surgery business.
NEXT HOMEPAGE

.

PAGE STATISTICS